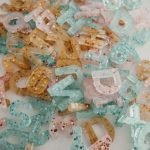
Resin Alphabet Letters
Wondering how to work with resin to make fun alphabet letters or other fun resin projects?! Don't worry, we got you covered and are sharing all our tips and tricks for working with resin and making these cute sparkle alphabet letters!
Yield: 1 alphabet/number set
Cost: 29.00
Materials
- 1 Resin Letter Kit (Get this kit for $29) or everything individually below
- 130mL Art Resin
- 130mL Art Resin Hardener
- 1 Alphabet Silicone Mold
- 1 Set Disposable Plastic Gloves
- 2 Silicone Beakers
- 1 Plastic Disposable Mixing Cup
- Glitter
- Resin Color Pigment
- Plastic Wrap/ Cardboard/ or Old Sheet Pan For Work Space
- Baby Wipes
Instructions
Prepare Work Space
- Start by preparing your work space. For this project you will want to work in a well ventilated area, turn on your stove top fan to get some air circulating or open a window. When working with art resin it's better to work in a warmer room than cooler for drying purposes. For the work space I put down plastic wrap on my countertop, then put cardboard on top of that to work on top of. An old sheet pan is another great option too work on as well.
Add Glitter To Alphabet Mold
- Put silicone alphabet mold on top of the work space. Sprinkle a small amount of glitter into each mold and spread them out as much as possible so there is not much glitter overlapping. Try to have the glitter not piled up. I found with the glitter/sprinkles if it's too layered it can create bubbles/divots in the project.Once glitter/sprinkles are added to your mold how you like, set it to the side of the work space.
Resin Time
- Now time to make the resin. When workin with resin make sure to have gloves on at all times! You do not want to get this stuff on your hands...or anywhere it's not supposed to be. (If you do get it on your hands, use a baby wipe to wipe off the resin. Nail polish remover can also do the trick, just apply to area on your hands where the resin is.) For this alphabet set including numbers, you will need 130 mL of resin and 130mL of hardener. (This is the perfect amount for this to fill this entire mold without wasting any extra resin.)In one silicone beaker measure out 130mL resin. Once you have 130mL of resin, add that to an empty disposable plastic cup. (If you buy the kit, the beakers only go to 100mL so measure out 100mL and then 30mL and pour into the plastic cup.) Next measure out 130mL hardener in your other beaker. (Do not use the same beaker used for the resin.) Once you have 130mL of hardener measured out, add it to plastic cup with the 130mL of resin in it. Try to be exact as possible when measuring.
- Slowly stir the resin and hardener together. For this you will want to stir slowly for 4-5 minutes. Do not skip this step! Stirring slowly will help reduce bubbles in the resin.
- Time to mix in a small amount of mica powder. If you want to do a couple different colors of resin, add small amounts of the mixed resin into different disposable plastic cups, then add a small amount of mica powder. You can skip this step and the next one if you are doing clear resin. The mica powder is very pigment concentrated so a little bit goes along way! Start with a small amount and know you can always add more :)
- Once mica powder is added, slowly mix the powder in the resin for about 2 minutes until powder is fully mixed.
Pour The Resin Mixture Into The Alphabet Mold
- Now for the exciting part! Time to pour the resin mixture into the silicone molds. I like to have a mixing stick on hand to help to catch the drip from the cup when pouring. Slowly pour the resin mixture into the letters/numbers one by one. When the letter starts looking pretty full, I like to get eye level to make sure the resin mixture is poured to the top. The 130mL of resin/hardener is the perfect mixture for this mold to fill all the letters and numbers.If you happen to pour in too much resin into a letter, grab a dropper from the kit, suck out a little resin and put it into another letter. Another option is to leave it, let the resin harden. When the resin is fully dry, take a nail file and file any excess off.
- Time to let the resin sit for 24 hours till it fully hardens.If any air bubbles pop up while it's drying, use a toothpick or a heat gun on low to get the bubbles out. (Or just leave the bubbles and not worry about it :)For cleaning the beakers, a baby wipe does the trick! Just make sure to still be wearing gloves so resin does not get on your hands.
After 24 Hours..
- After 24 hours is up, try taking one letter out of the mold. If it is tacky or bendy, put it back in the mold and wait another 24 hours. If it's still tacky after 48 hours, it is likely that the measurements of the mixture were off and time to start over again. Hopefully though that won't happen :)Once you pop out all the letters and numbers, have fun and enjoy those letters! When cleaning the mold after the letters are popped out, I found wiping down the molds with a baby wipe works great! Water and soap work too but can be hard to get any excess glitter off.
DONE!
- Wahoo, now you are done! What can you do with your resin letters?!?!? Use them to help kids learn letters or how to spell. Put them in a sensory bin with dried oats or rice. Super glue magnets on the back of the letters for new refrigerator magnets. Make keychains out of the letters. Use them in play dough and have some fun. Lots of great options.Thank you so much for stopping by today to learn how to make resin alphabet letters! Hope you had fun! If you make some resin letters, tag me (@kelseybang), and let me know how it goes! I would love to hear all about it! Hope you have a wonderful day!