

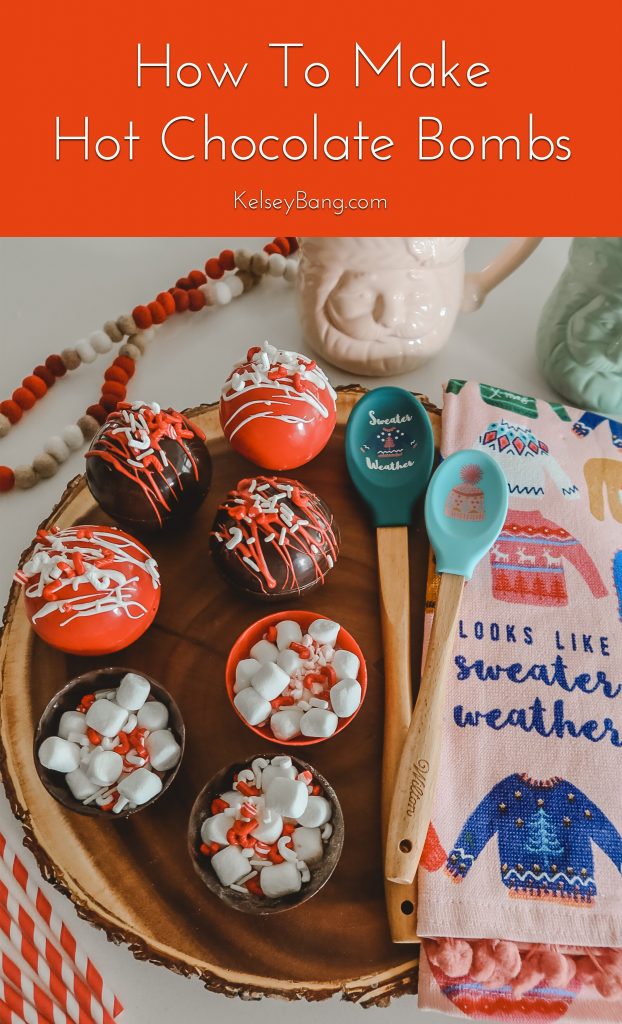
Have you been wanting to make hot chocolate bombs!?! But don’t know where to start?! Don’t worry, I got you covered! Sharing a step by step tutorial with detailed instructions on how you can make fun hot chocolate bombs too!

How To Make Hot Chocolate Bombs- Easiest Way
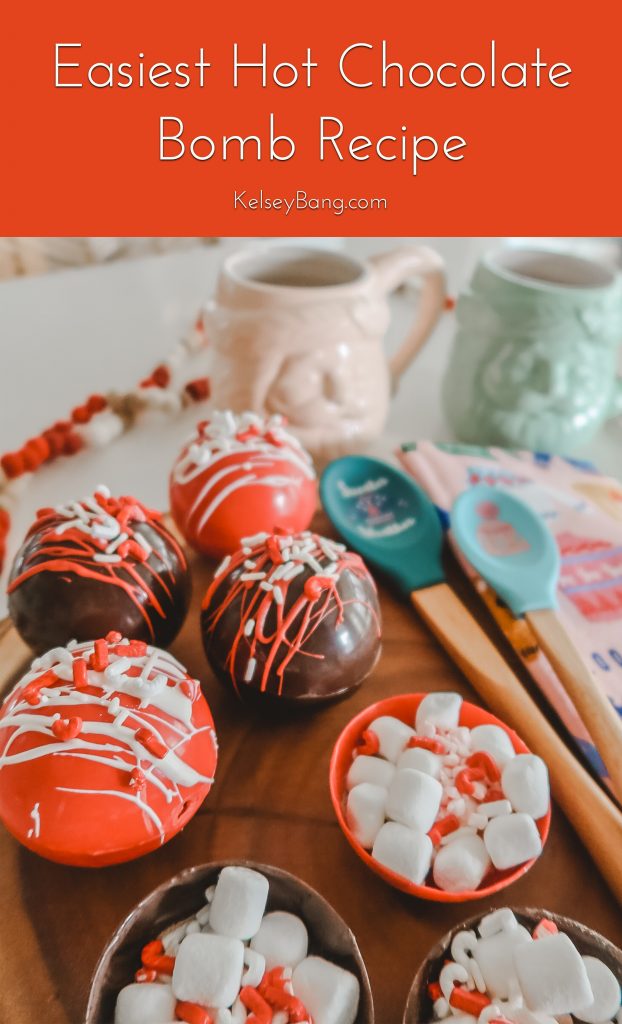
Ok anyone else see hot chocolate bombs trending like crazy right now?!!?!? Right when I saw a Reel for these, I ordered silicone sphere molds right away! These Hot Chocolate Bombs were so fun to make, and would totally recommend giving them a whack! In the tutorial below I share tips and tricks I learned along the way. And to whoever invented hot chocolate bombs….genius… THANK YOU! Best idea ever!
[spacer]
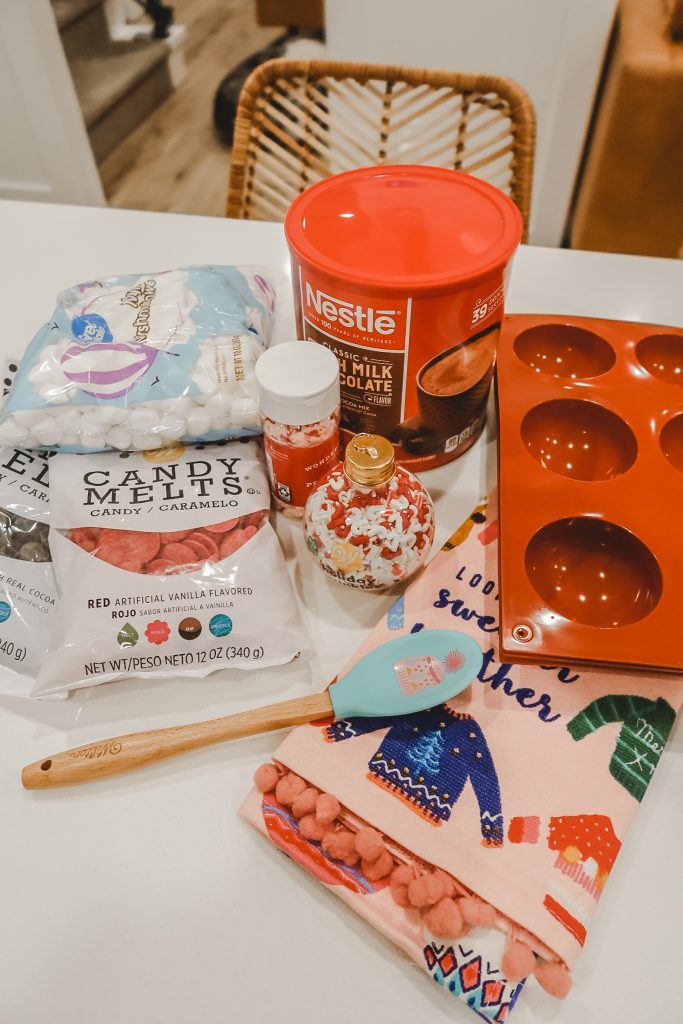
Ingredients
Melting chips (1-2 colors)
There are lots of kind of melting chocolates out there, but the Wilton melting chips never fail me! This is what I would recommend using! They are super easy to use and taste great with hot chocolate. Plus the chocolate turns out super shiny and makes for super pretty hot chocolate bombs! These come in lots of colors as well.
Crisco
This is not necessary but I would recommend adding it to the melting chocolate. For an entire bag of melting chips I would add a tbsp of Crisco for the perfect chocolate constancy.
Hot Chocolate
Any brand/flavor will do! I just did Nestle regular hot chocolate and it tasted great.
Mini Marshmallows
A bag of mini marshmallows or dehydrated marshmallows would be a fun option too.
Sprinkles
If you are looking to cut costs, no need to buy sprinkles. The sprinkles sure to add a nice touch though! If you are making Christmas hot chocolate bombs, crushed candy canes is a great option as well. (I found these candy cane ones at Joanns.

[spacer]
Supplies
Silicone Sphere Molds
Any sphere molds will work for this, but for convince and a super easy process…. use silicone molds! Silicone makes popping out the chocolate a breeze!
Spatula, Basting Brush, or Paint Brush
For painting the molds any of these will work great. Try avoiding using a metal spoon. Metal and chocolate do not mix well together. It can ruin the chocolate constancy and taste.
Chocolate Melter (optional)
This is not a must, but if you plan on making these a lot or other chocolate projects I would recommend getting one. A bowl in the microwave/ or heating chocolate melts over the stove top works great too!
[spacer]
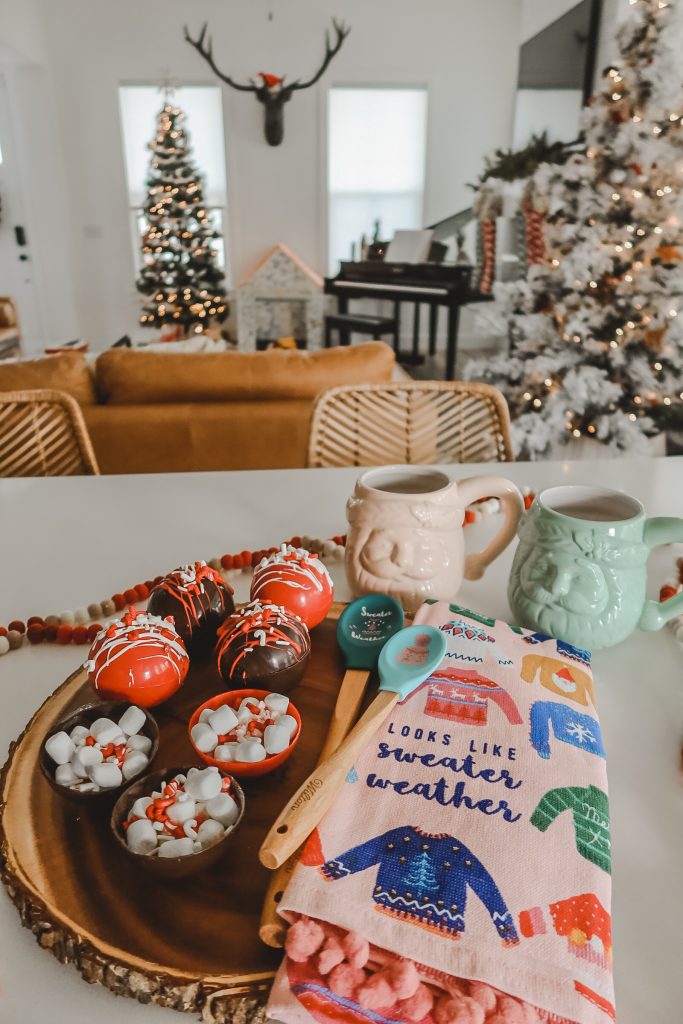
Mug
I found these fun Santa ones at Hobby Lobby. They have a lot of great options for mugs with wide tops. (Perfect for hot chocolate bombs!) Target is also a great place to shop for mugs!

Step One
Gather all the supplies.
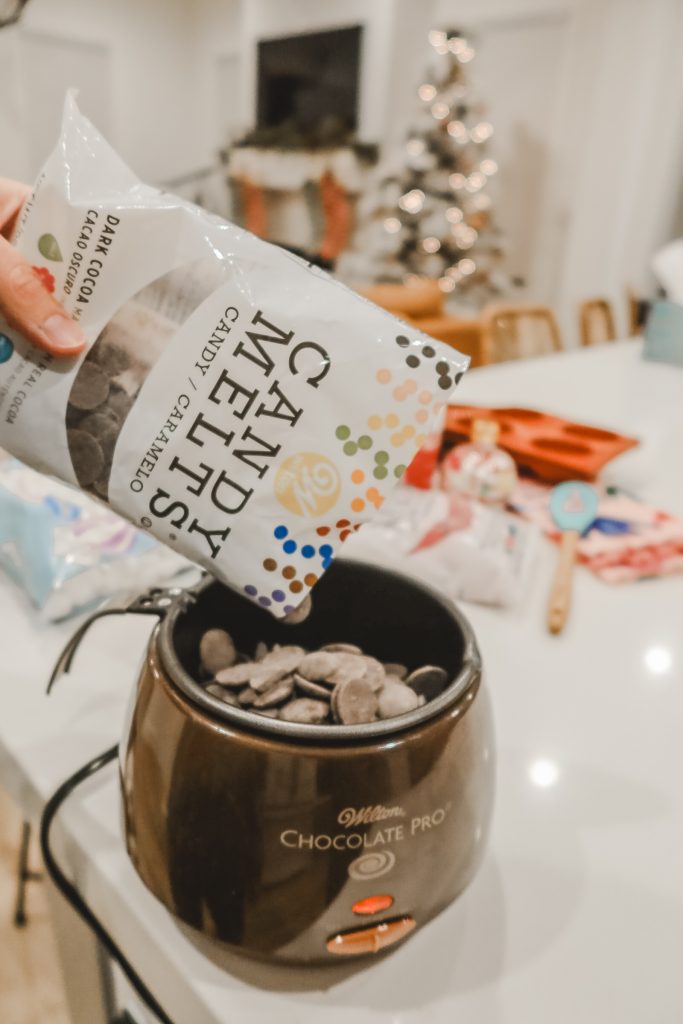
Step Two
Start by melting the chocolate. Follow the directions on the packaging to melt. If you are using melting chips I melt the entire bag, and add 1 tbsp of Crisco. This really helps to thin out the chocolate and make a smooth constancy.
Step Three
Grab silicone chocolate molds. Use spatula/brush to scoop in about a tablespoon of chocolate into each sphere. Start to pull the chocolate up on the sides, covering the entire sphere. If you need to add more chocolate, add a little to your brush and add more. Make sure to move your mold around to see if all areas of the sphere are covered.
Once the sphere molds are covered in chocolate, time for the fridge. Put the mold in the fridge for 5 minutes, or until chocolate is hard.
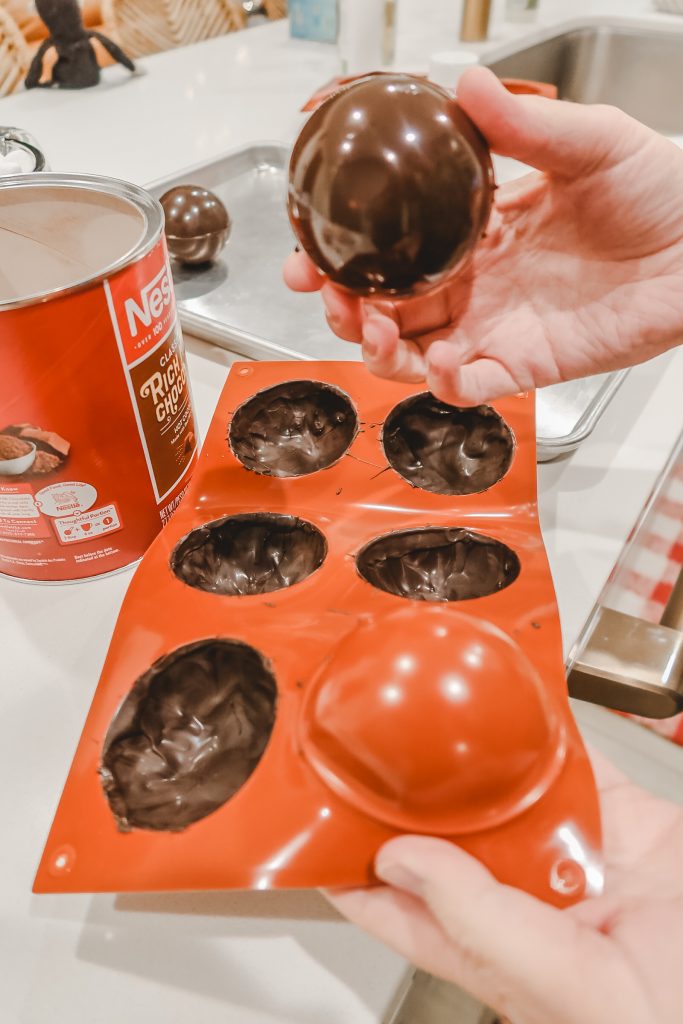


Step Four
Once chocolate has been hardened, time to pop them out of the mold. This is where the silicone molds come in handy big time! From the under side, slowly push, pulling the edges away from the chocolate till the chocolate sphere shell comes out. Once popped out, place that sphere cup side up.
When you are popping the chocolate out of the molds if the chocolate is too thin, put the chocolate back in the mold and add more melted chocolate.
For these next steps try to touch the spheres as little as possible. These spheres can be delicate and melt. Touching them a little bit will be just fine, but I just want to make you aware they can melt on ya with warm hands holding in one spot for too long.
Step Five
For this next step you can either microwave a glass plate till it’s warm, or use a pan on the stove top. I preferred the stove top. The goal here is to create a flat edge on the chocolate sphere. Turn the stove on low. Take one chocolate sphere and put it edge down on the pan for about 1-2 seconds twisting it. Once the edges are melted flat, put it cup side up on a plate. Repeat and do this for half of the chocolate spheres.
If you have 6 chocolate spheres, only warm the edges of 3 of them. If you have 18 spheres, do this for 9.
When you are done melting edges, turn off the stove. Any remaining chocolate on the pan can burn and it smells really gross. By turning off the stove helps to prevent this as well as needing to clean the pan an extra time.
Step Six
Time to fill up 1/2 of those chocolate spheres with goodies! You will want to fill up the chocolate spheres that you flattened the edges.
For each chocolate sphere that needs to get filled add 1 tablespoon hot chocolate, 6-10 marshmallows (depending on what fits inside) and sprinkles!


Step Seven
This next step is for the remaining choclate spheres that are not melted on the edges. These are going to be the tops of the hot chocolate bombs. Do step seven and eight for one bomb at a time.
For this next step grab one sphere filled with hot chocolate goodies (just have this one close by) and one empty sphere.
Just liked you did before, take your empty chocolate sphere edge down on a warm pan. Twisting the chocolate sphere so the edges flatten and melt just a little bit.
Step Eight
Quickly place the sphere that was just melted on top of a sphere that is filled with hot chocolate/mallows/sprinkles. Gently set it on top and push the spheres together. If any excess chocolate comes on the sides, use a finger or clean brush to even the surfaces. Then set the chocolate ball on a plate/table to dry.
Another option is to use any left over melted chocolate and pipe some chocolate around the edges to stick the pieces together. I found though if the chocolate is too hot it melts the sphere sides and can get excess chocolate everywhere. These hot chocolate bombs can melt super easy, and I found the stove top method more effective for me. Plus the stove top makes the edges perfectly flat for the edges to connect better together.
Step Nine
If you are doing a second contrasting color to the hot chocolate bombs, start melting the second color of chocolate. Once it is melted drizzle chocolate over the hot chocolate bombs. I just used my spatula and waved it over the hot chocolate bombs in a zig zag motion to create the chocolate drizzle design. Then while the chocolate is still warm, added sprinkles on top.
*Tip – Test the temperature of the melted chocolate before drizzling. If it is too hot it will melt through the hot chocolate bomb. If the melted chocolate is hot to the touch, but wont burn your fingers off… its good to drizzle.


Step Ten
Once you are done, try to test out your creations! Put one hot chocolate bomb in a large mug.
On the stove top in a pot, start to warm up some milk. I tried doing milk in the kettle and it makes for a harder clean up, plus it’s really hard to tell when the milk is warm. Just trust me on this one and use a pot! hahah
Time To Enjoy!
When the milk is done heating up….. Wahoo!! Time to enjoy! Pour the hot milk over the hot chocolate bomb. The bomb will start to melt and open up. Grab a spoon, straw, or candy cane and stir! Now enjoy that tasty treat!
Leftovers 🙂
Any extra hot chocolate bombs?!?! Wrap up and give as a gift or save for later! I used small bread bags to put a bomb in and tie up. Small gift boxes are a great option too.
If you are giving as gifts, try to be careful during transport. These can be fragile and melt easy!
If you get a chance to make hot chocolate bombs, tag me, I would love to see the creations you make! These are so much fun and sooo tasty!! Thanks so much for stopping by today, hope you have a wonderful day!
[spacer]
If You Liked This Post, You Might Like These Posts
Baked Brie- Perfect Holiday Appetizer
Easy Salt Dough Ornament Recipe- Perfect For Handprints
How To Make Marbleized Ornaments
Easy Christmas Gift Wrapping Ideas That Look Amazing
[spacer]
Shop The Post


Hot Chocolate Bombs
Equipment
- Silicone Sphere Molds
- Small Spatula
- Chocolate melter
- Small pan
- Cute holiday mugs!
Ingredients
- 1 Bag Wilton Melting Chips (Dark Chocolate)
- 1 Bag Wilton Melting Chips (White Chocolate – Any Fun Color) For a contrasting drizzle
- 2 tbsp Crisco vegetable shortening (one tbsp per chocolate color you plan on making)
- 9 tbsp Nestle Hot Chocolate mix (one tbsp per bomb)
- 1 Bag Mini marshmallows
- 5 oz Peppermint Sprinkles (one tbsp per bomb)
Instructions
- Add one tbsp of shortening to the melter, then fill with dark chocolate melting chips. Turn the melter to Melt and wait 5-10 minutes stirring occasionally until the chips are melted to a smooth consistency. Turn the melter to Warm
- Brush the melted chocolate into each silicone mold, making sure to cover any thin areas, approximately 2+tbsp per mold
- Put the molds into the refrigerator for 10 minutes until firm. Once done, pop out each molded chocolate half and place on a cool cookie sheet.
- Warm a pan on low heat on the stove top
- Take one half of each chocolate bomb and place the joining lip on the warm pan, twisting around to make the lip surface flat. Return to the cool cookie sheet. DON'T do this for the closing halves yet.
- Remove the pan from heat so the melted chocolate residue doesn't burn on the pan
- For each chocolate bomb, fill the flat lip half with 1 tbsp of hot chocolate mix, approx. 6 marshmallows and 1 tsp of peppermint sprinkles.
- Return the pan to low heat.
- For each bomb, smooth the lip of the remaining halves and quickly join with the half that has the mix, marshmallows and sprinkles. Hold for a few seconds as the warm edge cools and fuses the bomb shut.
- After cleaning the chocolate melter, add 1 tbsp shortening and melt 1/4 a cup of the white chocolate color chips on the Melt setting until smooth. Turn off the melter.
- Wait 1 -2 minutes for the chocolate to cool off a bit (but still remain warm and liquid, we just don't want it too hot). Dip a spatula and drizzle in fun patterns across the top of the closed bombs.
- Place finished bombs back into the refrigerator to cool for 3 minutes. Once firm, bombs can be placed in small bread bags and tied with ribbon for a friend!
- Place a completed bomb into a large mug and pour 2 cups of warm milk, stir and enjoy!


Elizabeth Walker
December 28, 2020Thanks for the recipe!
peter joe
June 22, 2026Thanks for great information i love it.