

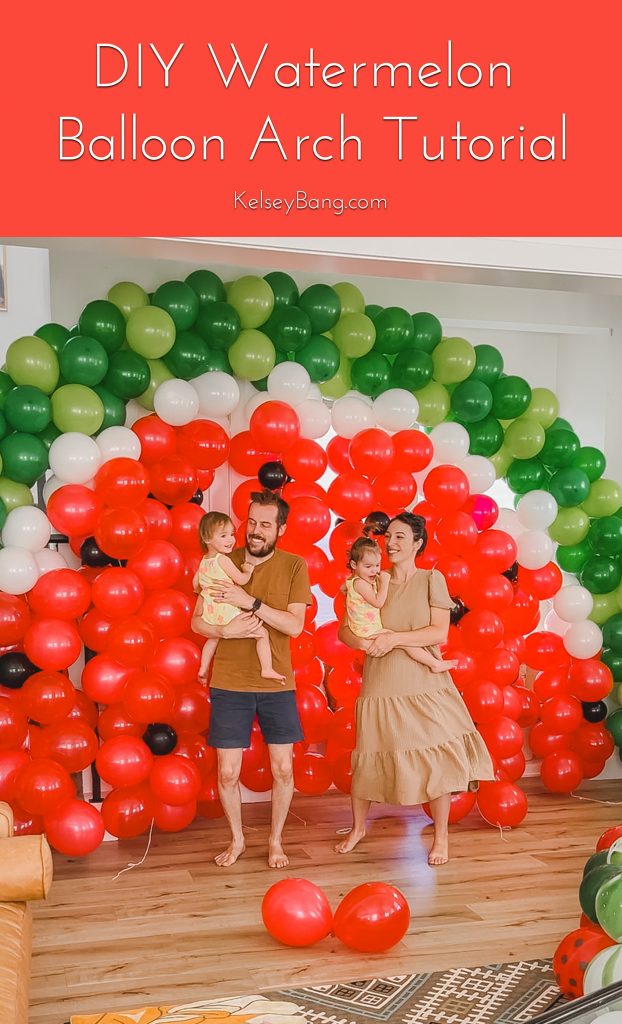
Looking for a fun summer balloon idea to take your party up a notch?! Try making a giant watermelon balloon arch! Perfect to make a statement at any party and add to the fun! Here is a step by step tutorial on how you can make a giant watermelon balloon arch too!

Watermelon Balloon Arch Tutorial
We recently had a fun little watermelon themed party to kick off summer. I had a balloon arch I had used for a few previous parties (gender reveal, twins first birthday) and I wanted to try and turn it into a watermelon. After searching online, I couldn’t find anything like what I was hoping to make. I shared my idea with Jake, he had a few ideas on how to make it work, and we went for it! This is what we came up with for making a watermelon balloon arch! On my Instagram, I was sharing the process live as we were making the watermelon balloon arch and was getting a lot of questions on how we made it. So…. here it is! How to make an epic giant watermelon balloon arch tutorial!
Supplies
String (I like a soft string that moves, is thin and does not stretch. This is my favorite to work with for making balloon garlands.)
60 Lime Green 12 Inch Balloons
110 Forest Green 12 Inch Balloons
50 Black Balloons (These can be either 5 inch balloons blow up all the way, or 12 inch balloons blown up half way.)
150 Red 12 Inch Balloons (I used a solid red and matte red to give a little contrast but all of the same red would work great!)


Command Hooks (to secure arch to a wall or fence)
Tape (any kind works but I prefer white/masking painters tape for this project.)

[spacer]
Tips & Tricks For Creating A Watermelon Balloon Arch
Build this balloon arch indoors. Clear out an area in your home to build it. This helps to avoid natural elements (aka wind, sun exposure, etc.). Also latex balloons change texture and colors when they are exposed to the sun. Balloons can also pop easier in the sun and grass as well.
Before adding any balloons to the arch, tape the polls. Any kind of tape works, but just wrap the tape around each end of the silver so they polls don’t pop out.
Have fun! This is a big project! Plan on a 4-5 hours to put this together. Start with blowing up all the green balloons and putting them on the arch. Then blow up all the white, red and black balloons to finish up.
If using the arch outdoors, I would recommend using command hooks to secure the arch to a wall or fence. As well as using heavy rocks or weights at the bottom of each red garland so it doesn’t blow in the wind. Or else it might turn into a watermelon octopus 🙂 We didn’t secure ours (see photos below) and it still worked but would of been better secured to the ground with weights.


Watermelon Balloon Arch
Materials
- Arch Kit
- Electric Balloon Pump
- Balloon Knotter
- String (I like a soft string that moves, is thin and does not stretch. This is my favorite to work with for making balloon garlands.)
- Small Plastic Hair Ties
- 60 Lime Green 12 Inch Balloons
- 110 Forest Green 12 Inch Balloons
- 50 Black Balloons (These can be either 5 inch balloons blow up all the way, or 12 inch balloons blown up half way.)
- 150 Red 12 Inch Balloons (I used a solid red and matte red to give a little contrast but all of the same red would work great!)
- 40 White 12 Inch Balloons
- Command Hooks (to secure arch to a wall or fence)
- Ladder or Step Stool
- Scissors
- Tape (any kind works, white painters tape is my favorite for this!)
Instructions
Building A Green Arch
- Grab your electric balloon pump, balloon knotter and all the green balloons. Blow up all the green balloons.
- Get the balloon arch kit. Fill up the bases with sand or water. (If you are transporting the arch from inside to outside, you can wait on filling the bases till they get to their final destination.) Next grab some tape and the connecting tube for the arch. Tape every metal part where it can pop out. The connecting tube is like a tent poll, and I found it helpful to tape down all the parts that can pop out on both sides so it doesn't pop out later if needed to transport or while putting it together.
- Next grab the balloon rings from the arch kit. (These are the small circles with 4 notches in them.) Start by putting 4 for the same green balloons on each ring. Do this till the green balloons are all on a balloon ring.
- Now for the fun part! Time to start creating the arch. Start adding the green balloon rings to the connecting tube by putting the connecting tube through the hole of the balloon ring with the balloons on them. Start with two dark green and one lime green and continue that pattern until the connecting tube can't fit anymore on it.
- For this next step it's helpful to have a buddy. Put the end caps on the connecting tub and start to bend it in a U shape to insert into the bases. Once the end caps are in the base, your arch should be up! Wahoo! Take a look at it, if needed add more green balloons.
Red Watermelon and Black Seed Garlands
- Time to blow up some more balloons! Blow up all the white and red balloons full size. The black balloons for the 12 inch size only need to be blown up half way.
- Once all the balloons are blown up, time to pair up the balloons. For this project pair the same color balloons up. Take two white balloons by the end and tie them together with the hair tie. Wrap the hair tie around the balloon ends about 3-4 times. Pair up all the white balloons until they are all matched. Then continue for red balloons and black.
- Now for the fun part! The interior of the watermelon is made up of a bunch of balloon garlands. Grab your ladder and put it near the middle of the watermelon. Climb to the top with your string. In the middle of the green balloons, on the connecting tube, tie the string. This string is where your first garland will be created. If you have your buddy around still, have them hand you balloons while you are still up on the ladder.
- Grab a white pair of balloons and make a loop around the pair of balloons in between where you tied them together with a hair tie. Then grab another white pair of balloons and hold them up close to the balloons that were just secured. Do the same thing with the string and loop around the middle of the balloons. If the balloons are too far apart from the previous pair of balloons, slide them up for a tighter fit. (Want to see a step by step video on how to make these? https://youtu.be/ZPGADqeBC7M)Now time to add some red balloons. Add a few red pairs of balloons and and a black here and there. Keep doing this over and over till the balloons hit the floor. If this is the final spot for your arch, tie the string in a knot and cut it. If you are planning on moving the arch, add about 12 inches of string and cut it. This is so you can adjust the balloons if needed when moving, as well as having some string to secure the garlands to rocks if moving outside.
- Time to make another hanging garland! Climb up that ladder again, and tie another string about a foot away from the previous garland. Repeat adding 2 pairs of white balloons, and then red and black ones.
- Keep adding hanging garlands till the interior of the watermelon is full. Don't forget to turn on the music and have some fun!
- Once the interior of the watermelon is full, you are done! ENJOY!If transporting the watermelon from one room, to another, grab a buddy to help. Take out the end caps from the base and hold the balloons up high in the air to transport. If using the arch outside, use the excess string to tie the end of each garland to rocks so they don't blow in the wind.
[spacer]
Thank you so much for stopping by today for a fun watermelon balloon arch DIY tutorial! If you get a chance to make this, let me know how it goes, I would love to hear how it turns out! Hope you have a wonderful day!
Want to see more parties we have done?! Check them all out here.
[spacer]
If You Liked This Post, You Might Like These Posts:
How To Make Pom Pom Party Hats
Easiest Way To Make A Balloon Garland
[spacer]


Jain Collections
January 29, 2025Discover the Best Bridal Lehenga Rentals in Mumbai at Jain Collections.
Enjoy luxury at Jain Collections. Get stunning bridal lehengas, elegant wedding dresses, elegant sherwanis, and suits for men in Mumbai. Our selection of curated options also includes stunning jewellery to complement your outfit. Renting our exclusive options should make your wedding day unforgettable.
Jain Collections
January 30, 2025Jain Collections offers wedding dresses in Mumbai at very affordable prices.
Take advantage of our vast assortment of trendy accessories to complement your Mumbai wedding gown rental. We have everything you require, from beautiful accessories to wedding attire to top your wedding dress and make your outfit stand out.
Meagan Cummings
November 9, 2025I love the creativity behind this giant watermelon balloon arch tutorial! It’s such a unique idea to transform a regular arch into a watermelon-themed masterpiece. The step-by-step process shared here is so helpful for anyone looking to add a Eggy Car Game fun touch to their summer parties. Using an arch kit, electric balloon pump, and string sounds like a manageable way to create a stunning decoration.